Configuring SNMP Alert Traps
Overview
The built-in Verba monitoring solution supports SNMP traps (v2), using a Verba specific set of SNMP Trap OIDs. Please refer to the following article: Alerts
In order for it to work, you need to configure it on all servers and desktop components installed in your Verba system, such as:
- Verba Recording Servers
- Verba Media Repository
- Verba Desktop Recorders
- Verba Remote Components (e.g. Lync Filters, Remote Capture Providers)
Step 1 - Activate the Verba System Monitor Service
Verba System Monitor Service is activated by default on all Verba systems and is configured for email sending. However it still worth checking that the service is not disabled and is actually running.
The SNMP traps are sent by the Verba System Monitor Service. In order to configure and use it, the service should be activated and started.
Step 1 - Login to the web interface with System administrator rights.
Step 2 - Navigate to the System / Servers menu item and select the corresponding server or desktop recorder from the list.
Step 3 - Click on the Service Activation tab.
Step 4 - Activate the Verba System Monitor Service using the  icon.
icon.
Step 5 - Verify under the Service Control tab that it is running. If not, start it with the  icon.
icon.
Step 2 - Configure SNMP Traps
Step 1 - Go to the Change Configuration Settings tab of the server/desktop you want to configure
Step 2 - Open the System Monitoring / SNMP Notification Target category in the tree
Step 3 - Click on the  icon for adding a new SNMP Trap Target.
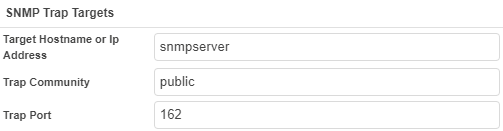
Step 4 - In the right panel, provide the Target Hostname or Ip Address, Trap Communitiy and Trap Port settings. Click Save.
Step 5 - After making the changes clicking on the Save button in top right corner of the configuration tree.

Step 6 - Set the SNMP Version.
Step 7 - A notification banner will appear on the top. Click on the click here link, so you will be redirected to the Configuration Tasks tab. Click on the Execute button in order to execute the changes.
